Apply Lump Sum Dollar Amount
The primary purpose of the Direct AR program is to allow the direct posting of lump sum debits or credits to a customer’s AR account with a payment card.
The program also automatically creates an open item on the customer’s account by posting an incoming payment document. This functionality is similar to that of a customer sending in a check with no reference to any current open item and then requesting that the funds are placed as an open credit amount to their account.
The Direct AR clearing program may be run in either manual or batch mode.
Procedure
If you get an Access Denied error, contact your SAP/PCMA System Administrator for program access.
-
Go to the Receivables Management → Direct AR menu option (program /PMPAY/PRE_DAR).
-
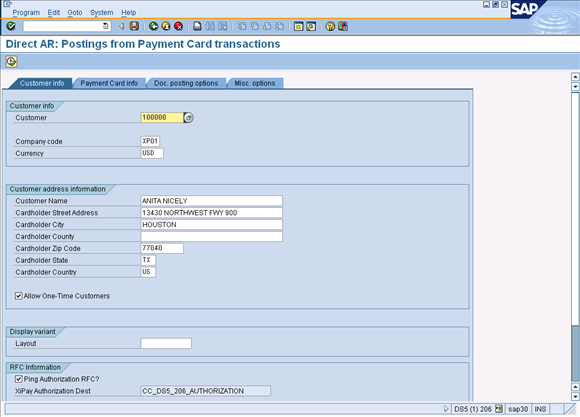
On the Customer Info tab, enter the Customer Number or click the drop-down list to select.
-
Enter the Company Code.
-
Enter the Currency.
-
Click the check mark or press Enter. The Customer Address Information sections will be populated by information from the customer master. This information can be overwritten, if necessary.
-
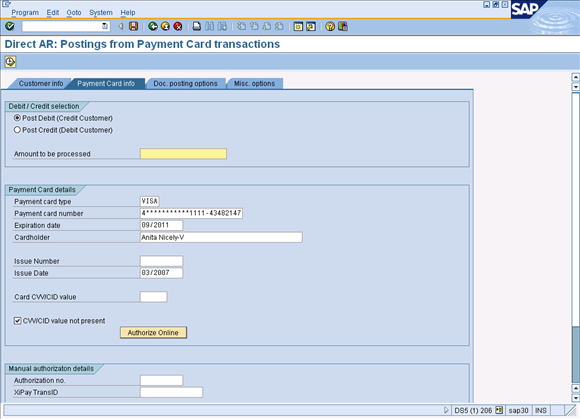
Click on the Payment Card info tab. The payment card information defaults from the Customer's Master Data if specified. XiIntercept for SAP is NOT available for Direct AR at this time.
-
In the Debit/Credit selection section, choose one of the following options:
-
Post Debit (Credit Customer) – A DEBIT charge to appear on the customer’s credit card statement and a CREDIT will be posted to the customer’s AR account in SAP.
-
Post Credit (Debit Customer) – A CREDIT charge to appear on the customer’s credit card statement and a DEBIT will be posted to the customer’s AR account in SAP.
-
-
Enter the Amount to be processed. If a default payment card is stored on the customer's master record, the details of that card will automatically populate the appropriate fields.
-
Enter the details of the Payment card if they have not defaulted. If the Card CVV/CID value is present, the checkbox will automatically be deselected.
-
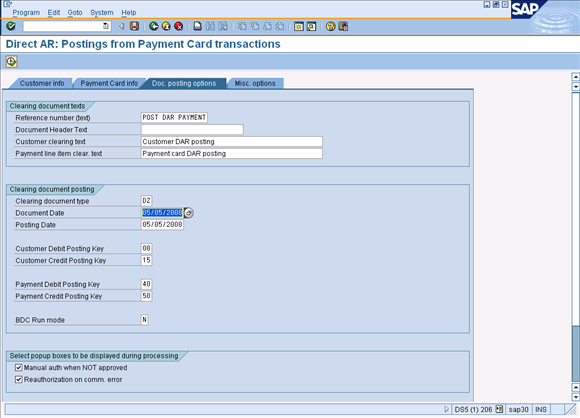
On the Doc posting options tab, verify the reference number (text) and document date.
Authorize Online
-
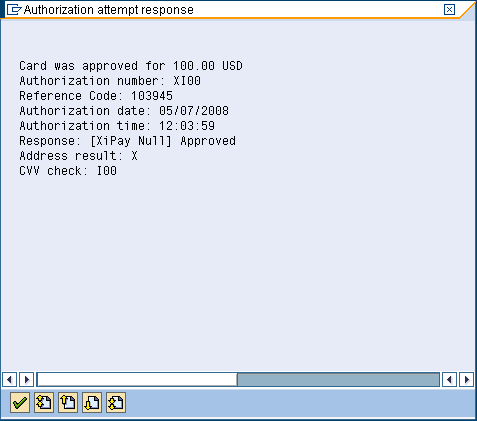
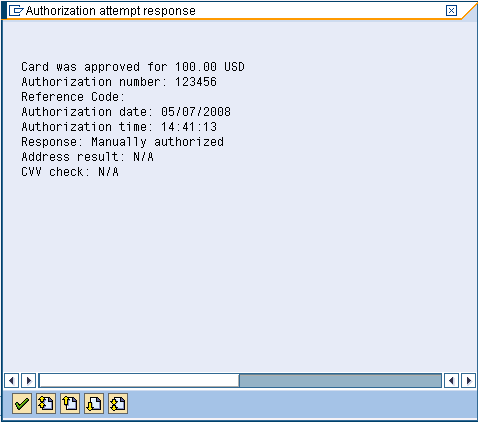
On the Payment Card info tab, click Authorize Online. The system will attempt to connect via a TCP/IP RFC call to XiPay. The Payment Card details, amount to be processed, and address information from the Customer info tab will be sent through the SAP Payment Card Interface (PCI) and forwarded by XiPay to the clearinghouse. Once the response from the clearinghouse is received by XiPay it will be returned into SAP and a pop-up box showing the results will appear.
-
Choose from the following options:
-
If authorization is Approved, then go to the next step.
-
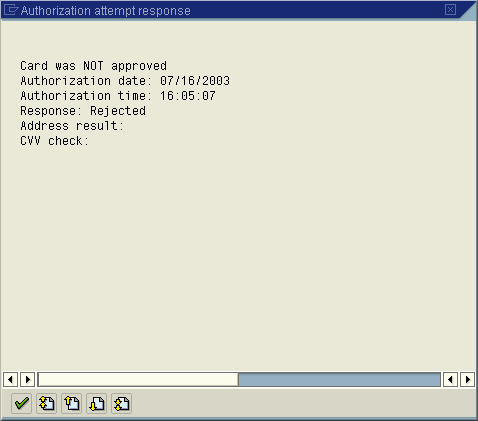
If authorization is Unapproved, then go to step 7.
-
-
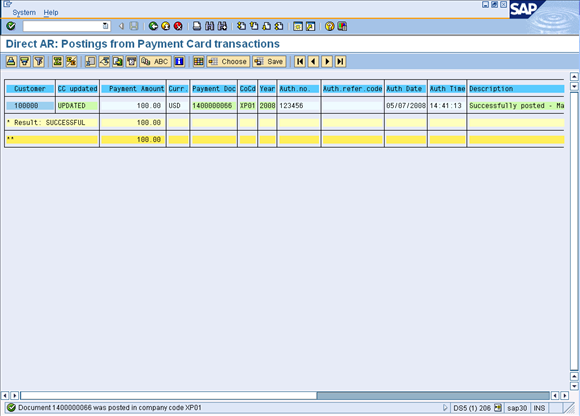
Click Continue. (A payment document is posted using the approval details received from the clearinghouse.)
-
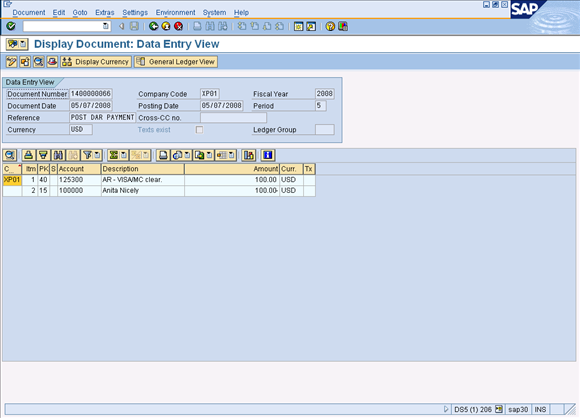
Click on the document number in the Payment Doc column to view the payment document. If a document could NOT be posted, it is recommended that the Direct AR program be run in BDC mode ‘A’ to try to determine why the document could not be posted. Often, this is due to a change to the field status group of the Credit Card Receivable account making a field required that the Direct AR program does not supply.

-
The posting to the Credit Card Clearing account will be picked up by the standard SAP settlement program the next time it is executed for this GL account.
-
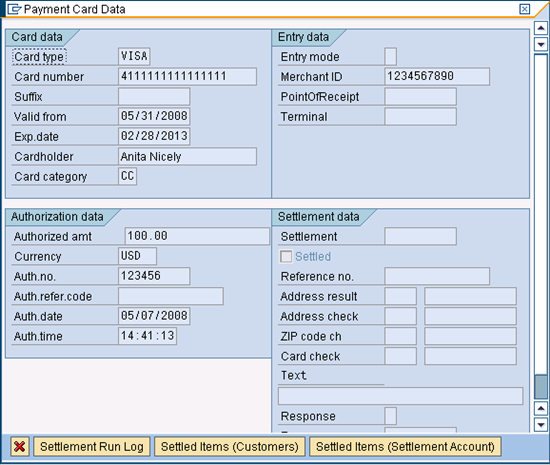
Double-click on line one of the document to display the detailed posting to the Credit Card Clearing account. To view the credit card data, go to Extras > Payment card data.
-
Click the check mark or press Enter.
-
Choose one of the following options:
-
If the Manual authorization when NOT approved checkbox was selected then ...
-
A pop-up box will display to enter an authorization and/or authorization reference code (XiPay transaction ID) obtained outside of SAP.
-
Enter the Auth. no. and Auth. refer. code. Warning: The Auth. refer. code field should ONLY be populated with a XiPay Transaction ID. Do NOT enter any information in this field other than a XiPay Transaction ID. FAILURE TO FOLLOW THIS RECOMMENDATION MAY RESULT IN LOST OR CORRUPTED DATA.
-
Click the check mark or press Enter.
-
-
If the Manual authorization when NOT approved checkbox was not selected then ....
-
Return to the Payment Card info tab to enter process a manual authorization.
-
Continue with the next procedure.
-
-
Manual Authorization
-
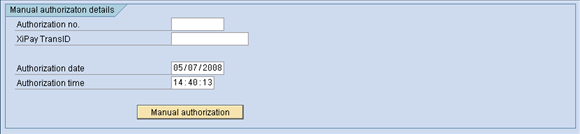
On the Payment Card info tab, scroll down to the Manual authorization details section.
-
The Debit/Credit Selection and Payment Card details sections must be completed prior to using manual authorization.
-
Enter the Authorization no. obtained outside of the SAP system.
-
Enter the XiPay Transaction ID.
The Authorization reference code value should ONLY be populated with a XiPay Transaction ID. Do NOT enter any information in this field other than a XiPay Transaction ID. FAILURE TO FOLLOW THIS RECOMMENDATION MAY RESULT IN LOST OR CORRUPTED DATA. -
Click Manual authorization.
-
Because the authorization details were entered manually, there will be no values in the Address verification and CVV check response codes.
-
Click the check mark or press Enter. (A payment document is posted using the approval details received from the clearinghouse.)
-
Click on the documented listed in the Payment Doc column to open the payment document.
-
Double-click line one of the document, the posting to the Credit Card Clearing account to display a detail screen for the posting. To view the credit card data, navigate on the menu to Extras >Payment card data.